
The following week we choose a random winner.
Hey ABSers! It’s strange to think that I’ve been a contributor for over a year now, but that this is the first Studio Saturday I’m hosting. I’m excited for the chance, though a little nervous, too.
Why? Because I’m kind of the oddball contributor, in that I don’t sell jewelry anymore. My focus these days is on blogging, color theory, and photography, so I’m in a slightly different position from other contributors – I’m more of an art bead lover, versus maker. This means my studio isn’t so much a room in the house, but programs on my computer. If that’s the case, then what can I share with you?
How about a quick and easy editing tip to make your photos look good?

After taking thousands of photos over the last few years, I’ve come to realize that every photo needs a little help. No matter how perfect I may have gotten the shot in-camera, 99.99% of the photos need a boost.
Maybe you’ve had the same experience, where you’re a little disappointed at how your photos look once you’ve uploaded them onto your computer. This doesn’t mean your camera isn’t good; even basic point-and-shoots nowadays are vastly better than the cameras from just a few years ago, so the camera isn’t the issue. The issue is that just taking the photo is only half of the equation; the missing half is editing. Getting a perfect photo you don’t have to edit straight of the camera is like winning the lottery; it’s possible, but not necessarily probable. To give you an idea, out of the thousands of photos I’ve taken, there have been only four I felt didn’t need any work.
There’s a lot of cool tips and tricks you can learn to make your photos pop, but let me share one quick thing you can do today to improve your photos. It’s subtle, but really effective: adjust the levels for your photo. What are levels? The levels of your photo refers to the mix of your highlights, shadows, and midtones. When you adjust those levels, you’re changing the way your photos appear.
To do this editing trick, you’re going to need a program like Photoshop, Photoshop Elements, GIMP, or an online-based editor (I like Pixlr.com’s Editor best – it functions in a similar way to Photoshop). I tend to shy away from the editing programs that come with a camera because they don’t allow me to edit the way I want to. If you don’t have Photoshop or Photoshop Elements, try either GIMP or Pixlr.com, both of which are free (GIMP is a program you download, Pixlr works in your web browser).
Step 1: Go ahead and open up a photo whatever program you’re working in, then locate the levels menu in that program.

For Photoshop Elements, you can find the levels menu by going up to Editing on the top Program Bar, then down to Adjust Lighting, then over to Levels. For Photoshop, go to Image > Adjustments > Levels. For Pixlr, make sure you’re under the Advanced Editor, then go up to Adjustment > Levels.
The menus, when they come up, will look like this:

Step 2: Adjust the levels by moving the toggles underneath the graph.
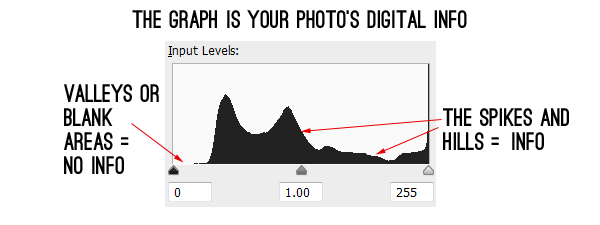
Once the levels menu is open, take a minute to look at it. You’ll notice a section called Input Levels that holds a graph. That graph is your photo broken down into highlights, shadows, and midtones. The spikes or hills you see on that graph correspond to information in that photo. If you see a large hill on the right hand side, your photo has a lot of lighter tones. If there’s a large hill on the left, your photo has a lot of darks in it.
Each photo will translate into a graph like this, but keep in mind each graph will vary in appearance because each photo will have slightly different amounts of highlights, shadows, and midtones in them. So if your graph looks different than the example, it’s suppose to.
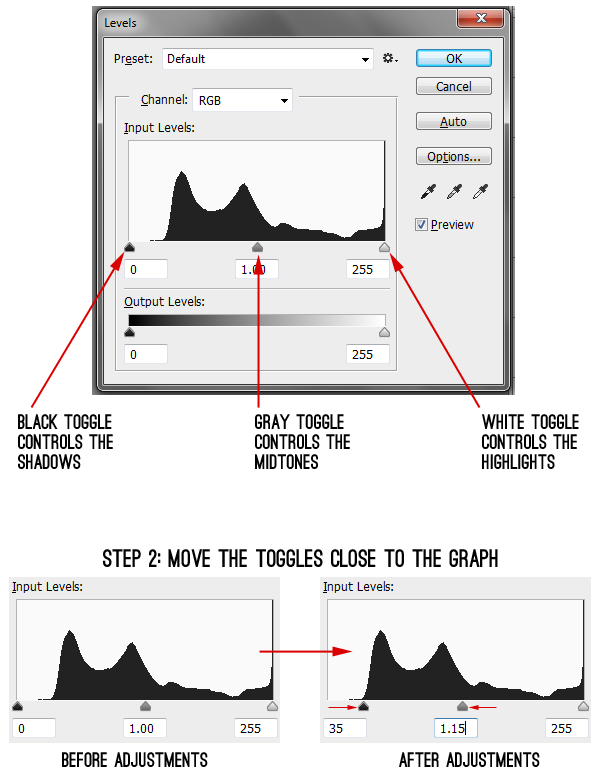
Click and drag the white and black toggles to right next to the graph. What you’re doing here is cutting out the parts you don’t need, the flat parts of the graph. Those flat areas don’t contain any information vital to your photo, only the spikes do. So by moving the toggles next to the graph, you’re readjusting the range for the shadows and highlights.
The closer to the graph you move with your white toggle, the brighter the highlights become. The closer you move your black toggle, the darker the shadows become (and the richer the colors become, too). As for the gray toggle, you can move it a little left of center to brighten up everything, or a little right of center to darken up everything.
Be careful when moving the toggles. You can cut off a little bit of each hill’s ends, but you don’t want to go too far.For example, if your graph touches one of the edges, like it does near the white toggle on my graph, you don’t have to move it at all. Remember, that’s information, so if you eliminate too much, you can blow out your highlights and shadows. Same goes for the gray toggle in the middle; moving it too far left or right will give you dramatic, not subtle, results. Instead, use the graph as a guide, and move the toggles right next to the hills.
Step 3: Save!
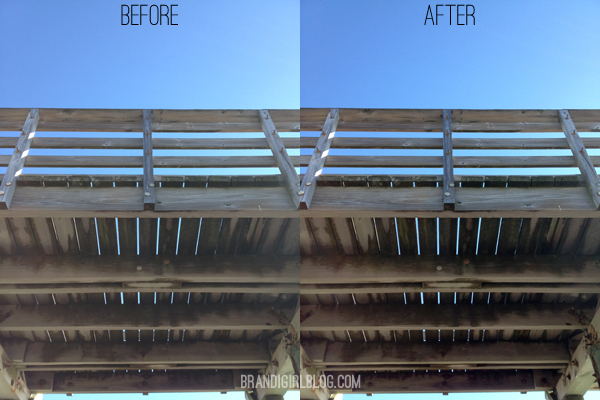
Easy, right? And it only takes a minute. With just this one trick, you’ve improved a bunch of things: you’ve made the dark areas richer, the brights brighter, and improved the tones and colors in your photo. It’s subtle, but really powerful.
Photoshop/Photoshop Elements Tip:
If you’re working in either Elements or Photoshop, consider using an adjustment Levels layer instead of going through the levels menu directly. Instead of going up to Enhance/Image, locate the adjustment layers button on your Layers Panel – it’s a circle that is half black, half white. Click that and choose Levels from the dropdown menu.

The benefit is to doing it this way is that you can adjust the levels over and over without touching the main photo. By going through the Levels Panel directly, you’re permanently changing the levels. If you’d like to adjust that later, you’d have to undo everything you did up to that point or start over. With the adjustment levels layer, you have the freedom to come back later and tweak over and over.
Giveaway!

This week, I’m giving away a set of actions for use in Photoshop or Photoshop Elements. These are actions that I’ve made for myself to simplify my editing workflow, and include quick shortcuts for resizing, brightening a photo, and a few fun actions, too. They aren’t for sale, but one lucky commenter will get a set they can use to help them edit, too!
What if you don’t have Photoshop or Photoshop Elements? I’ll send you two Palette Club prints instead, your choice.
To enter, answer one of these questions: What’s your favorite editing/photo trick? What do you struggle with the most when taking or editing a photo? What look are you going for with your shop photos – a more subtle, natural look, or something more drastic?
For more photo tips, take a look at the Tip Share page on my blog!