
Hello and happy Thursday everyone! Today, I’m bringing you a tutorial which I shared on my own blog last year. We are mid-January right now and for most of us that means chilliness, darkness and a long, long month post-Christmas. However, I’m sure I’m not the only one looking ahead to the warmer months (hurry up Spring!) and thinking of lighter, brighter and more playful styles and designs. For me, that very much means reaching for the Irish waxed linen cording, and some of my favourite art beads. I hope you enjoy this wee tutorial!
I’ve always been a little unhappy with linen cord loops, worrying that they weren’t quite sturdy enough, even covered with beads, to really work as a clasp. Last year, I had a brainwave whilst making a knotted bracelet – I had two really long tails left, and I came up with the idea of half-hitching one cord onto another to see what would happen. I am sure that many, many people have done this before me, and I’m certainly not claiming this as my own – but it was definitely a lightbulb moment for me! I thought I’d share what I did with you here. I’ve used 7ply Irish waxed linen cording in Lilac – 7ply is a great choice for bracelets (which need to stand up to a bit more rough and tumble than earrings or necklaces) because it’s almost twice as thick as 4ply, but still goes through most beads with a little practice.
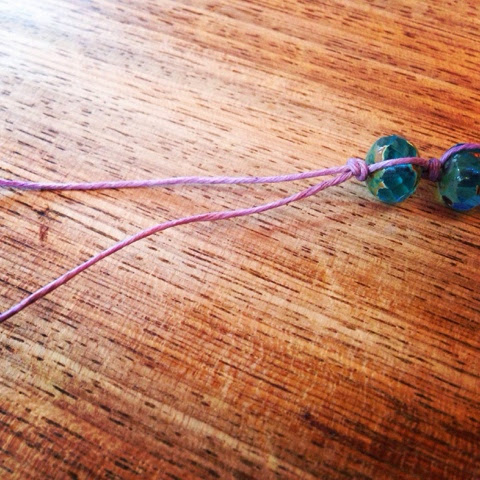
1. Finish knotting the main part of your bracelet, ending with two loooong cord ends. If you like, you can leave one much longer than the other so as not to waste too much. You do need a lot of cord to knot with for this! I’m not a measurer, but you may want to work out exactly how much cord you’ll need after you’ve made a couple. My brain just doesn’t work like that!
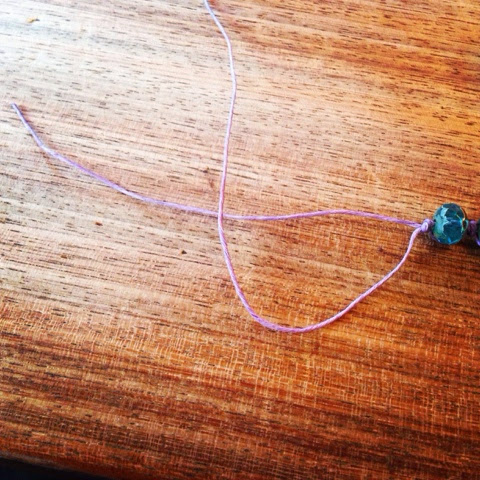
2. Bring one cord (the working cord) over the other to make a u-shaped loop.
3. Bring the working cord back through the loop.
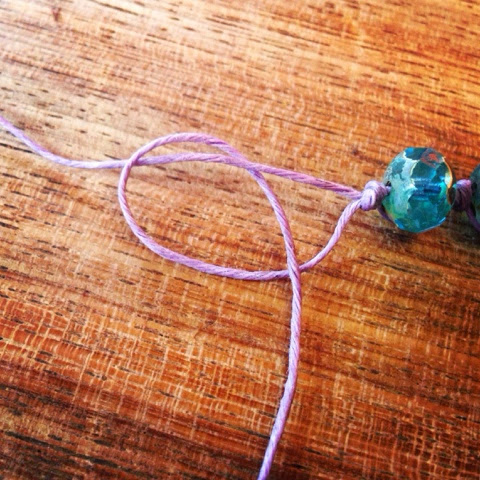
4. Pull snug to form a half-hitch knot.
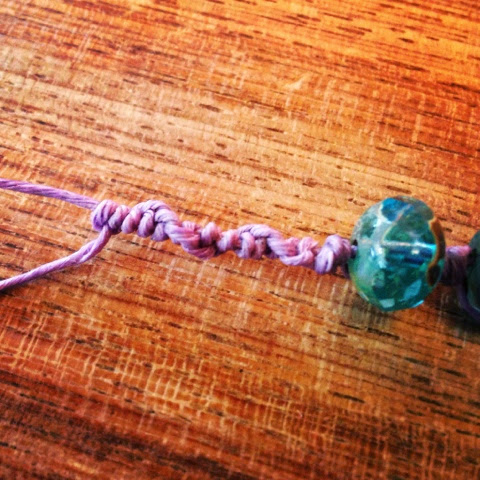
5. Repeat these half-hitch knots, using the same working cord, to form this spiralling rope.
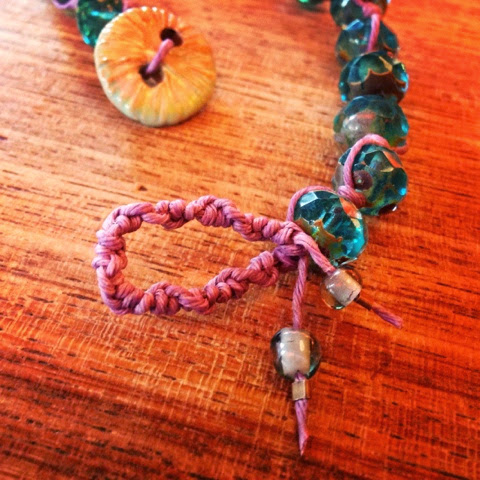
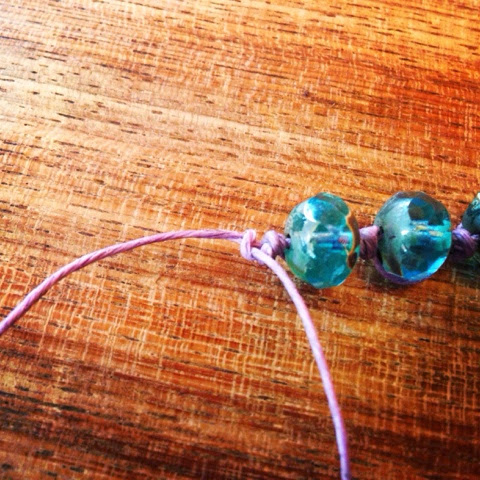
6. Tie the working cord around the base of the rope to form a loop. I tie a double knot and then added a few beads to the tails, crimping them on.
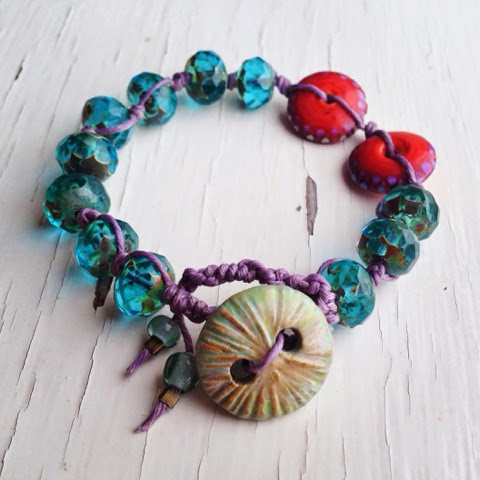
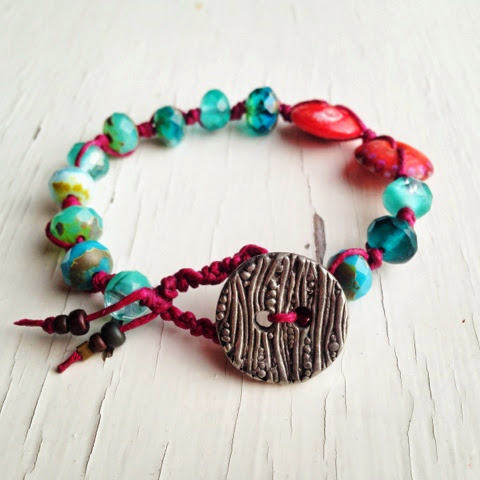
7. Here’s the finished bracelet! And another one with different cord/beads below:
Art beads from – www.mamacitabeadworks.etsy.com
Pressed glass, 7ply Irish waxed linen cord and Vintaj brass crimps from –
Rebecca is a Scottish jewellery designer; currently living in Edinburgh, capital of her native land. You can read more about her and her work at her blog, songbeads.blogspot.com and see more of her jewellery at songbead.etsy.com. She also has a supplies shop at thecuriousbeadshop.etsy.com.
Lisa Comperry
January 22, 2015 at 9:22 pmI will have to try this technique 🙂
Christine Walker
January 22, 2015 at 9:37 pmLove this tutorial and gorgeous bracelets 🙂
Lottie me
January 22, 2015 at 9:48 pmGorgeous, thanks for the tutorial, I have a lot of cord which I bought from you but was at a loss on how to use it creatively. But I do now
Carol Briody
January 22, 2015 at 11:58 pmThank you for this tutorial! Your bracelets are fabulous! The colors pop and bring a big smile!
Melanie McGready
January 23, 2015 at 8:05 amBeautiful!! Thanks for sharing.
bairozan
January 23, 2015 at 8:39 amA definitely good option that brings color and texture into the design!
lindalandig
January 23, 2015 at 10:42 amThanks for the great tute Rebbecca!
lindalandig
January 23, 2015 at 10:42 amThanks for the great tute Rebbecca!
TesoriTrovati
January 23, 2015 at 4:30 pmI love doing the half hitch for the loop. I think I learned that from Erin Siegel. Makes me wish I knew more knotting techniques! I like the way the knots twist for that added texture. Great tutorial Miss Rebecca! Enjoy the day. Erin
Becky Pancake
January 24, 2015 at 6:32 pmHi Rebecca, your bracelets are beautiful. I have used this technique before and it works well.
Sherry
January 24, 2015 at 8:57 pmGreat tutorial!