
Hi
There! I’m Terri Del Signore from artisticaos. I am a ceramic bead
artist and I’m looking forward to sharing a tutorial with you! This is
something that I have been experimenting with, and I am quite excited to show
you what I’ve learned so far! Hollow clay forms using paper.

I work
with ceramic clay but this concept could also suit polymer and metal clay
projects. In fact, somehow, somewhere, I came across paper beads used to
make hollow polymer beads. I don’t make polymer beads, but round paper
beads are sold on Etsy for this purpose. The idea is that you wrap your
polymer clay around the paper bead, bake it, drill holes, and soak the bead to
soften the paper pulp. Then remove the paper pulp with fine tip tweezers. You
are left with a hollow polymer bead.
Even though I don’t make polymer beads that idea sparked a different
idea for me.
This seemed like something I could try with ceramic clay because extreme
temperatures in the kiln would completely burn away paper, leaving only a
hollow ceramic bead. I wanted to play around with this idea because I
have a background in papermaking (as we artsy folks tend to dabble in more than
one medium;). I figured this way, I could make various shapes to be used
for hollow beads, and not be limited to just round beads. Who wants limits
right!!??
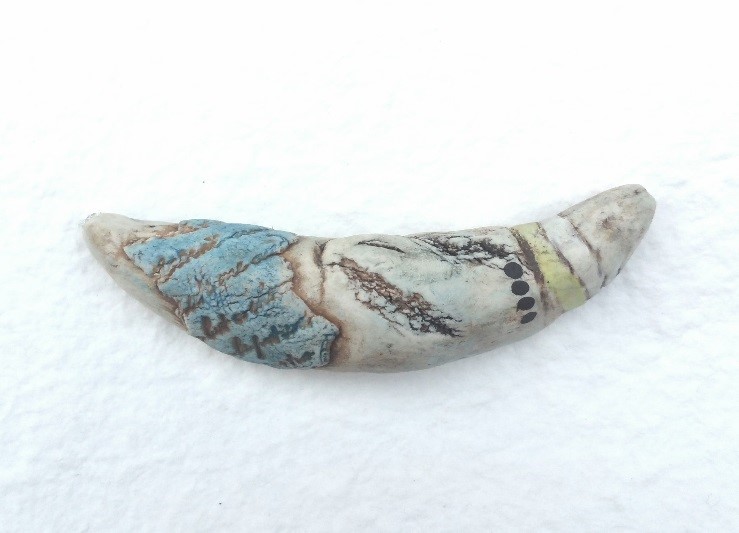
I always have tons of ideas, and many that don’t work – but not this time! It
worked! Here is a completely hollow bisque bead that I made using a paper bead. The paper is completely gone, and all that is
left is a hollow ceramic bead!
I will
share what I did and some things I learned.
And the best part is that it is really simple!!
Making
paper shapes to use to make hollow clay beads.
Materials
needed
Cotton
paper pulp and warm water
Equipment
needed
Blender
and dehydrator
See
that is not a long list of materials! If you don’t have a dehydrator you could
improvise with an oven, on the lowest setting, left open – or a heater even!
Cotton paper pulp is purchased through paper-making supply places. I have
had mine for a very long time. I bet you a good quality cotton toilet
paper or paper towel would work too! If you try it – let me know how it
turns out!
Add
warm water to your blender and add some ripped cotton paper pulp. Exactly how
much is difficult to tell you, but, it’s better to start with less and increase
as needed. I say this because I once killed a brand new blender by adding too
much pulp. Now I have a Ninja, and it would take a lot more than paper to
kill this beast!! I love this machine!!
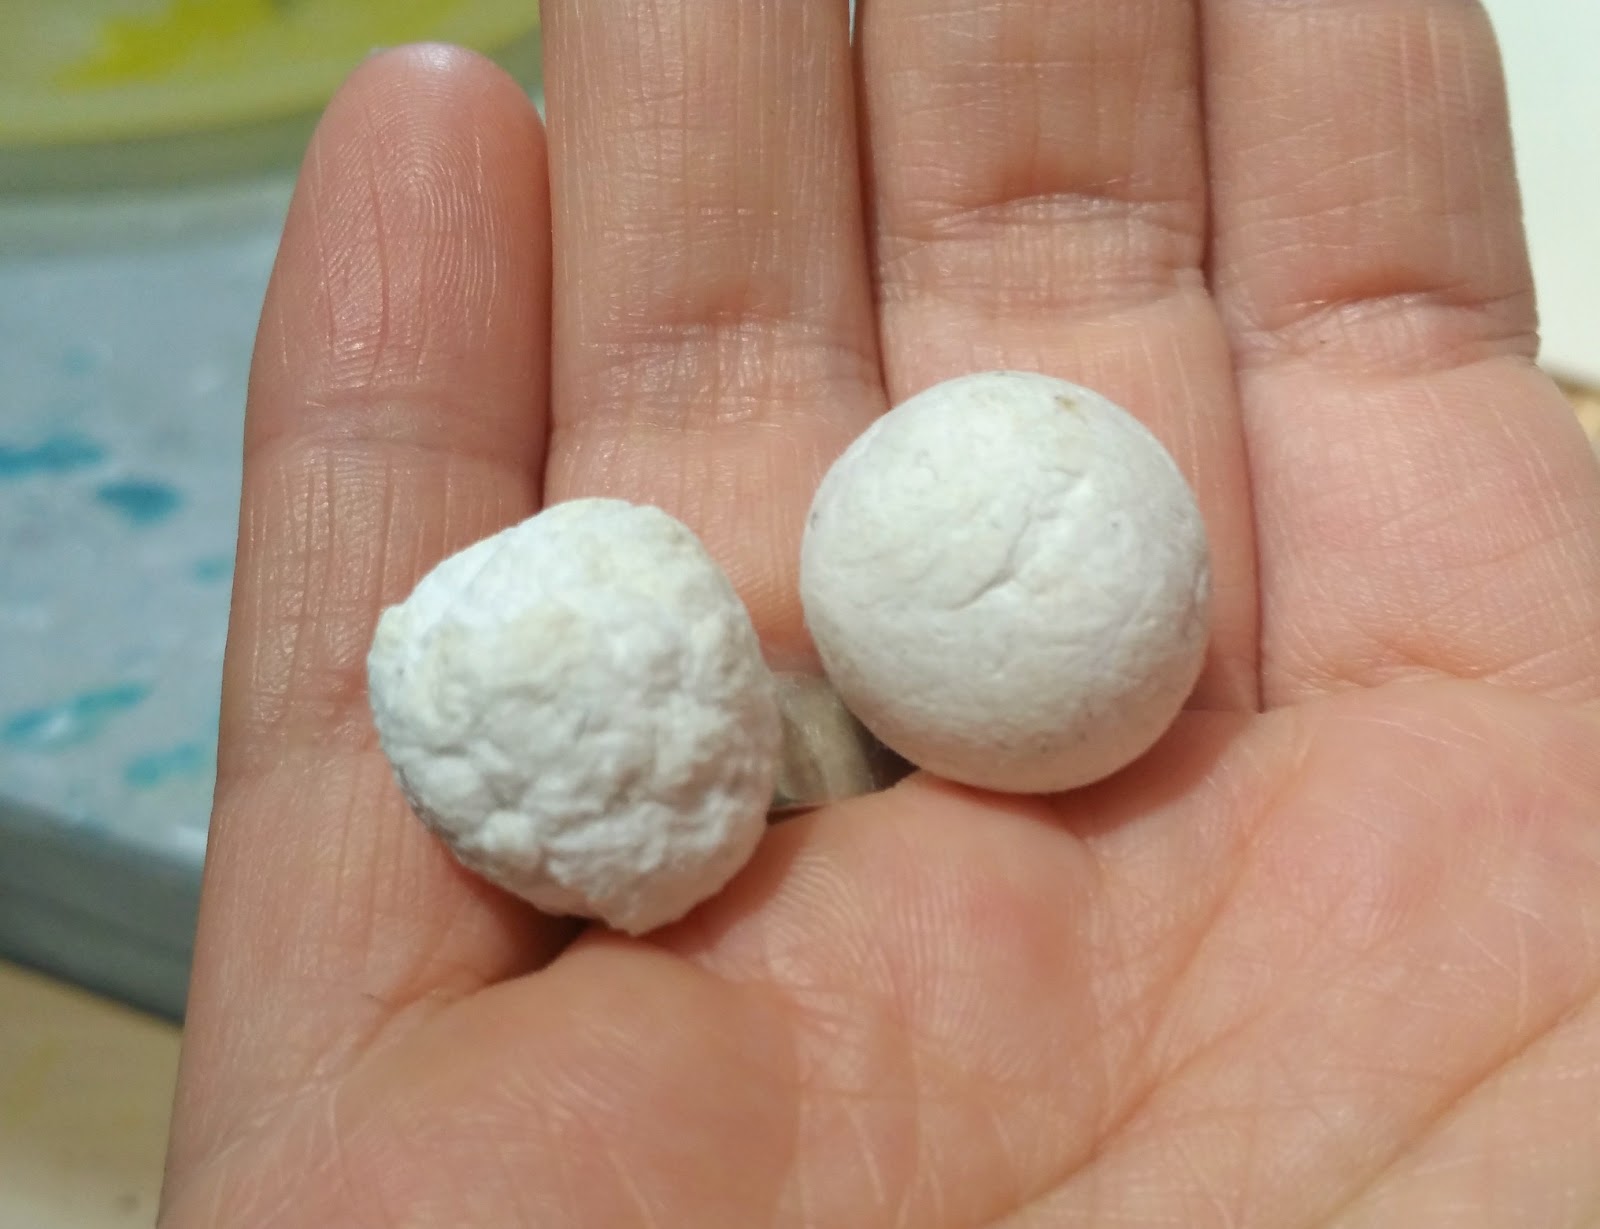
The left photo is paper pulp sheet.
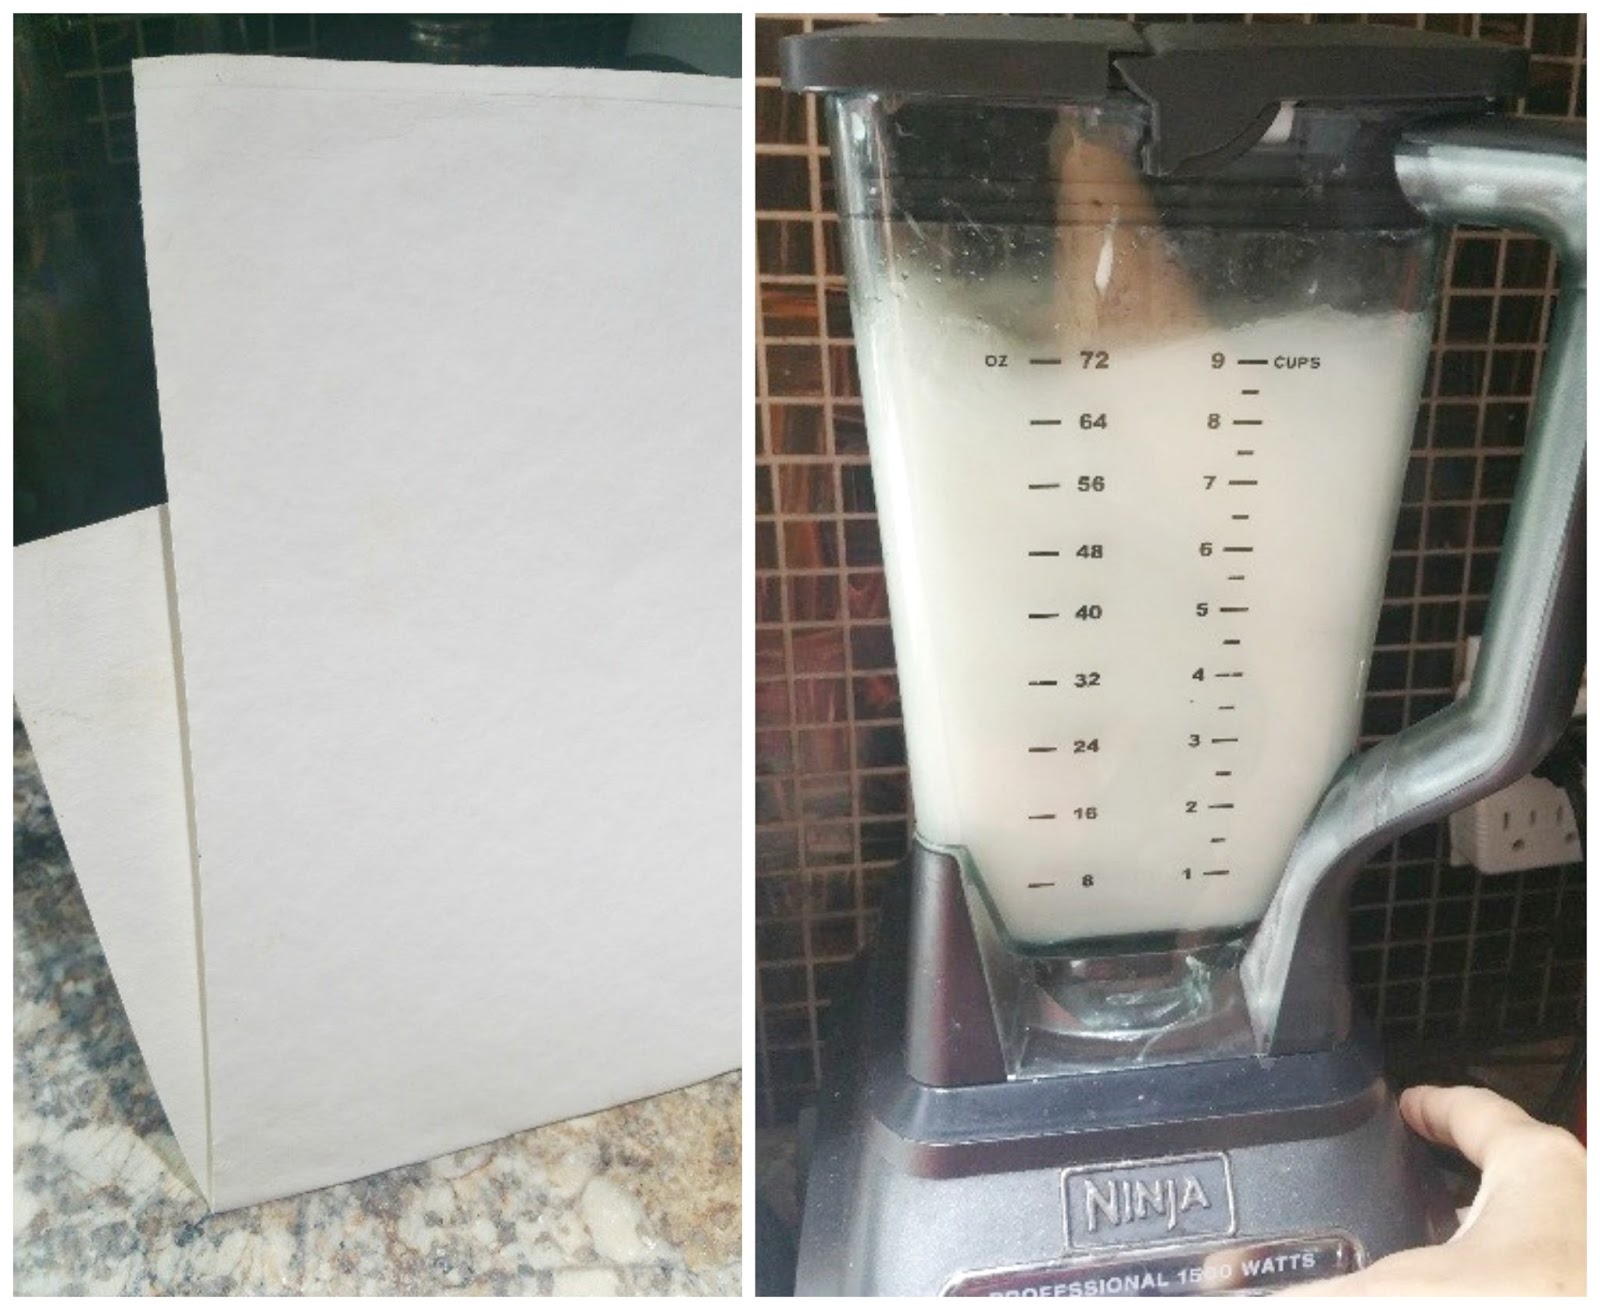
Blend
to a pulp (literally)!
When
done, slowly lift out an amount in your hand that would suit your size and
shape for your design. Try to get the correct amount the first time,
because adding to it is not ideal. You will learn this as you go and get
better at it. Gently squeeze water out while forming your desired shape.
Don’t try and get all the water out to the point you distort your shape. You will get a feel of what I mean. Working gently is key to maintaining
shape. A little practice will help but I promise it is really easy!!
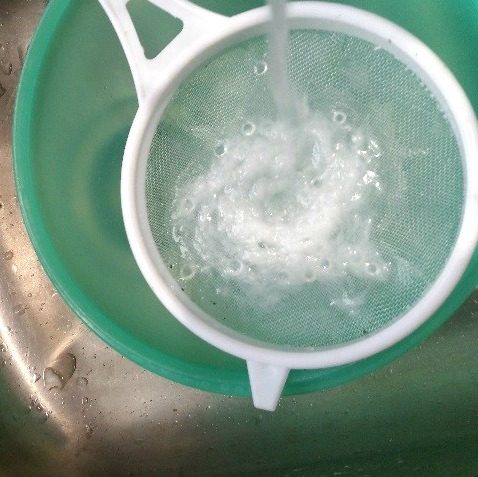
To remove the remaining pulp, you
will need to use a fine strainer once the pulp starts getting low and hard to
grab.
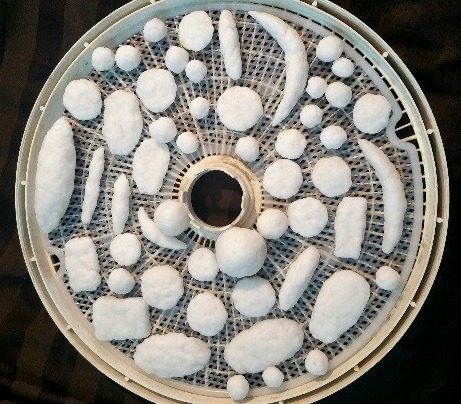
Once
you have your wet paper shapes. Put them in your dehydrator to dry. Does
anyone see my winking emoji;) in the photo below? I got my husband’s smaller dehydrator when he
upgraded to a commercial one. I snuck
these into my husband’s, while he was making jerky. I kind of expected him to
ask – but he is so past asking questions about my seemingly strange art
projects about the house – even when they end up next to his jerky!
Once
dry – they will be ready to use for your clay creations!!
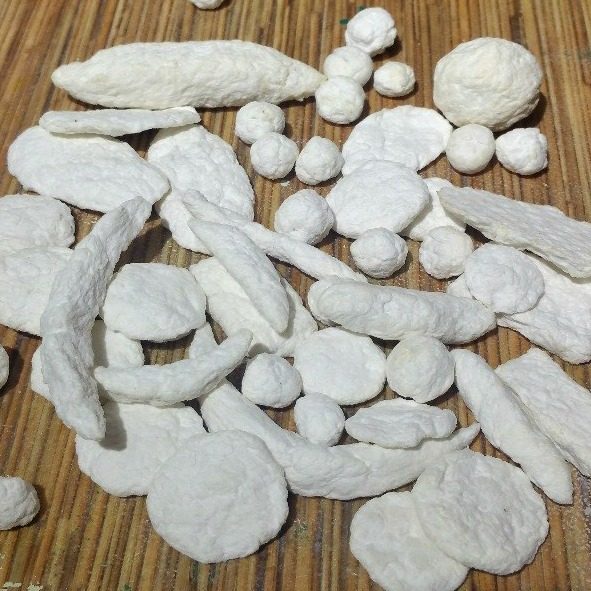
The
clay you use to put over the paper will naturally want to take on the shape of
your paper shape. If your paper shape is really rough and bumpy texture (as
thick handmade paper tends to be) you
will have to compensate by how you shape the outside. Either go with the rough
texture and work it into your design or spend the time smoothing it out.
I did come up with a way to make your round beads smooth so that you can
easily make nice smooth, round, hollow beads.
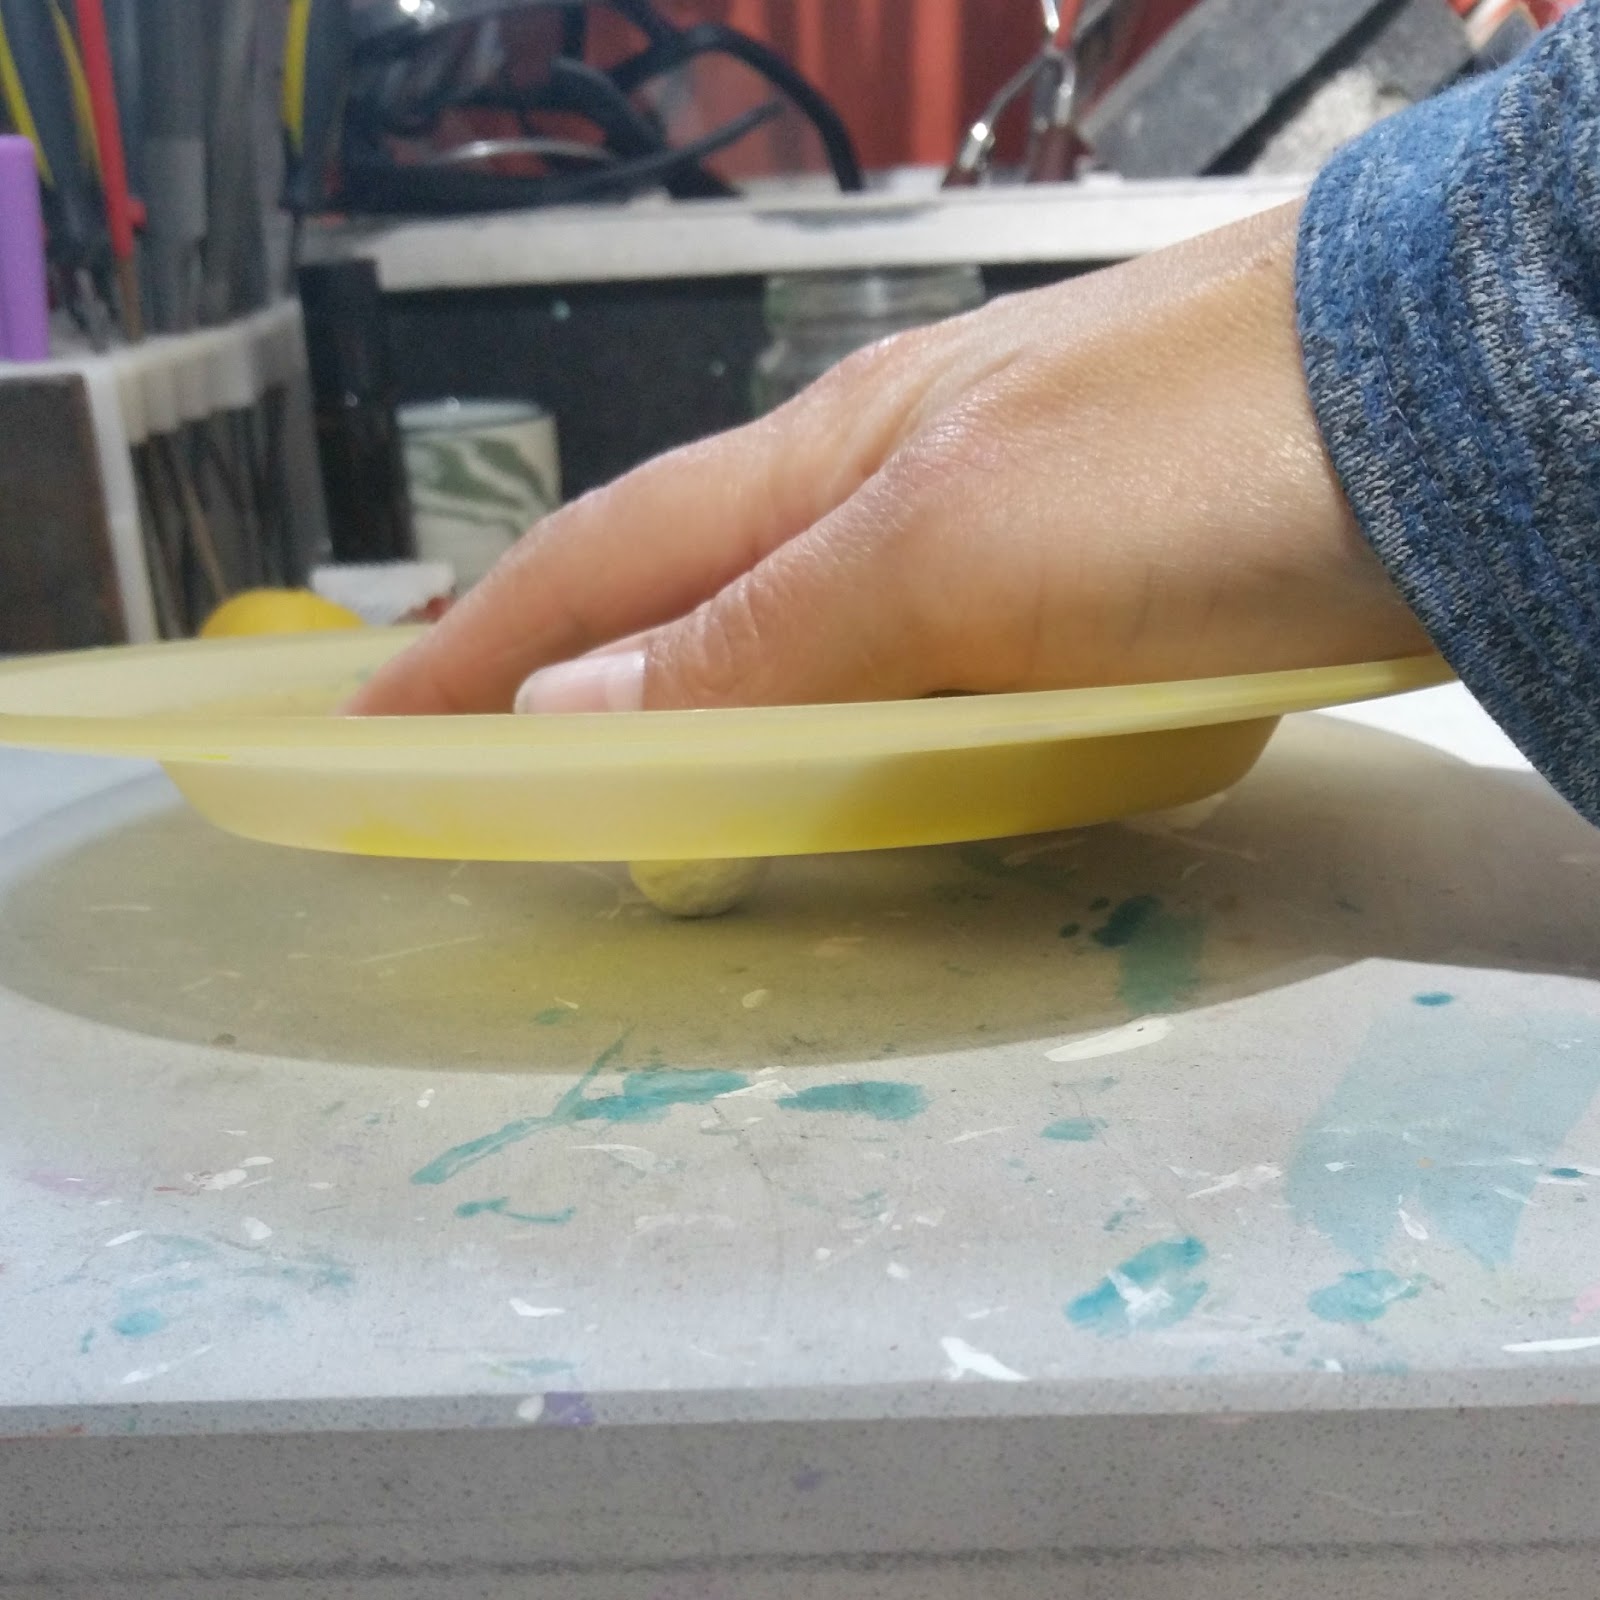
The
technique is to gently roll your rough round beads between two perfectly flat
surfaces. As you can see I am using really advanced equipment for this;)
A plastic plate and a flat table top. The important thing is that both have a
smooth, flat, textureless, surface!
Here
is a pic of the difference it makes.
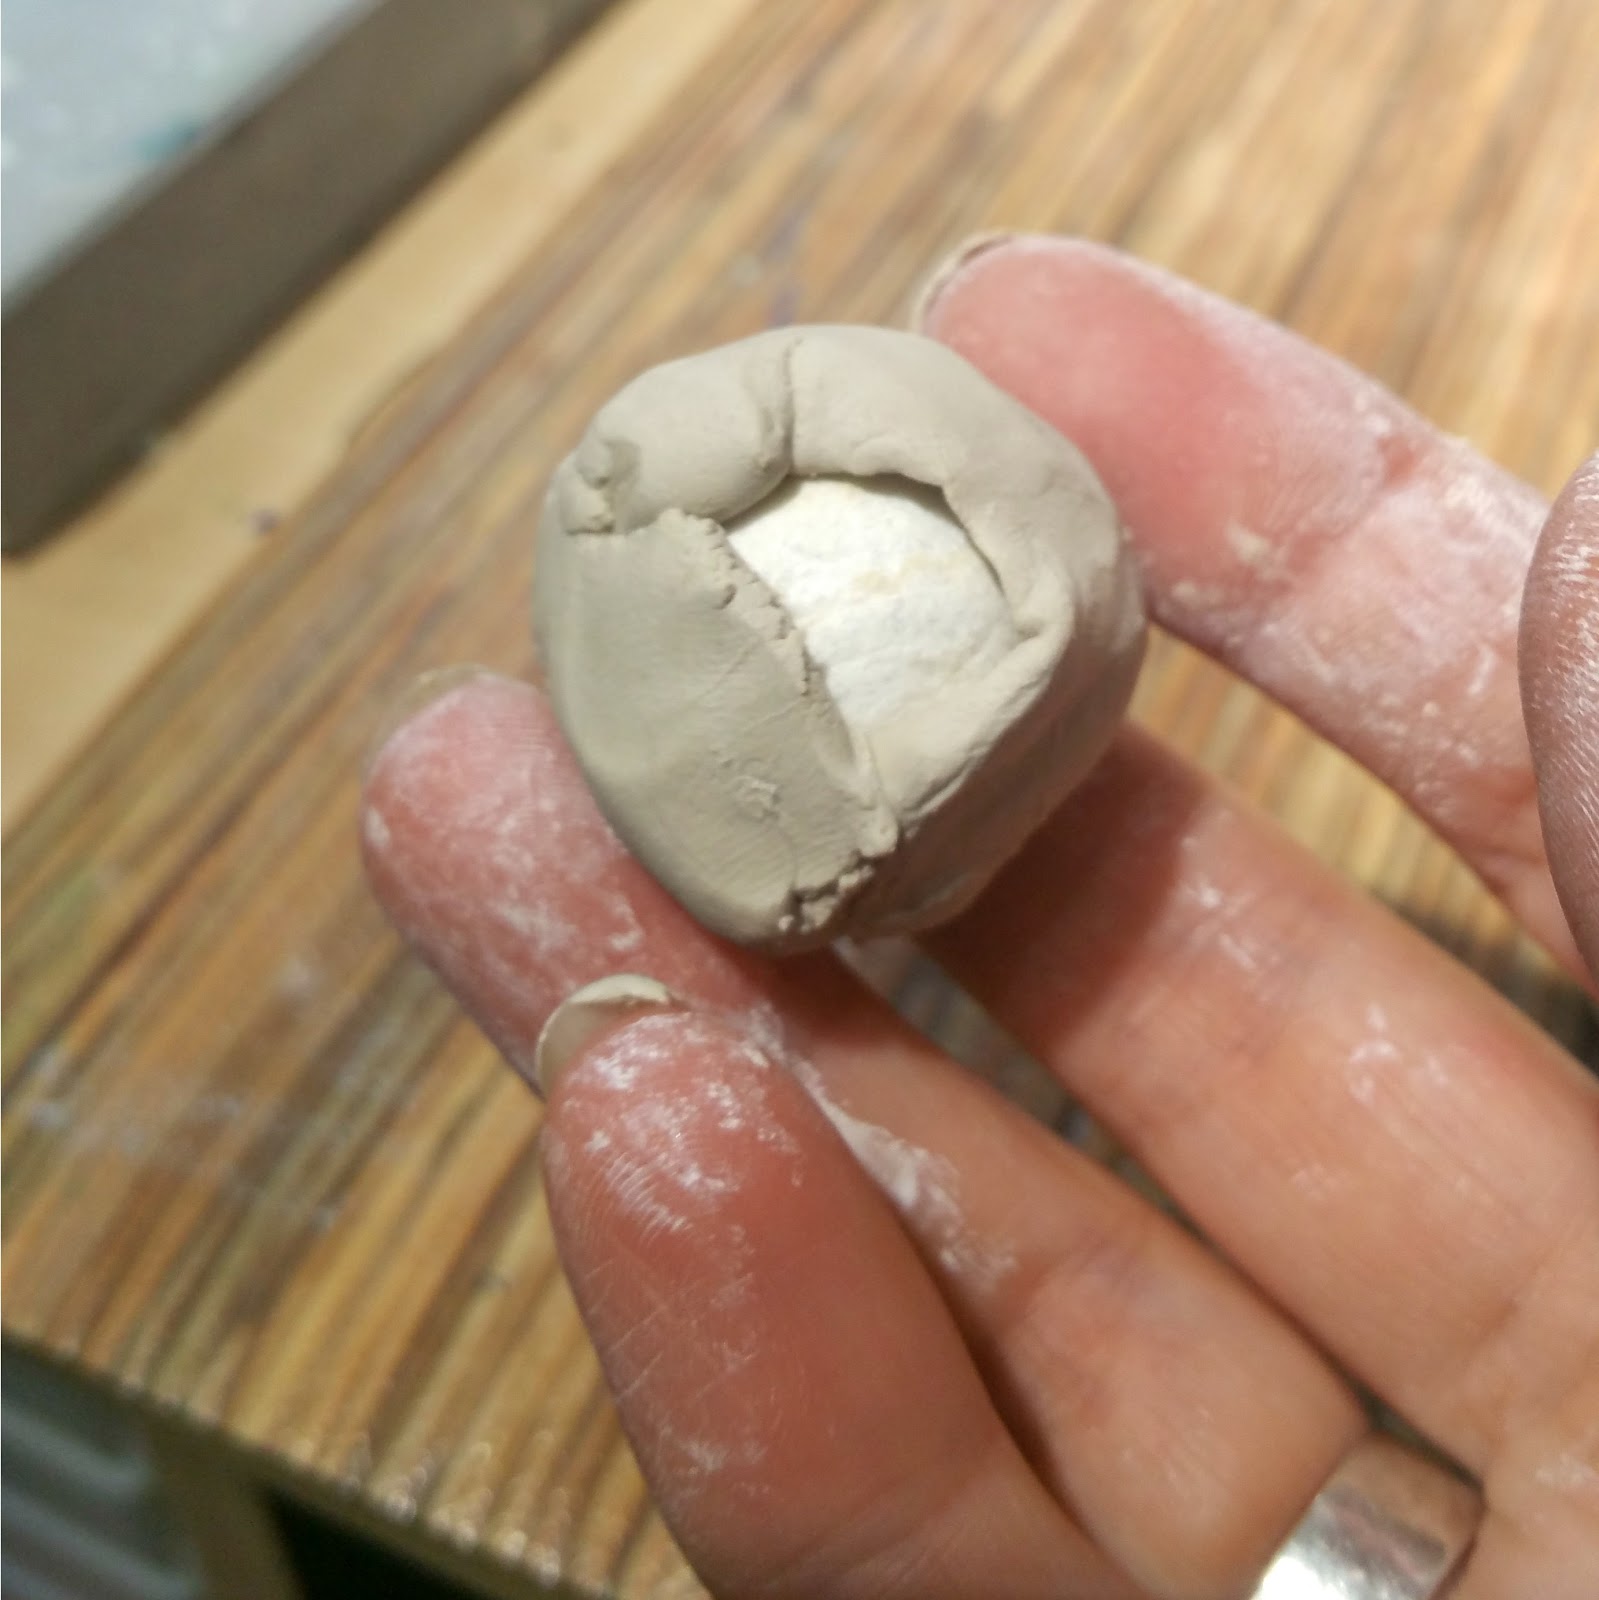
Now wrap
clay around your paper shape and let the creative juices flow!
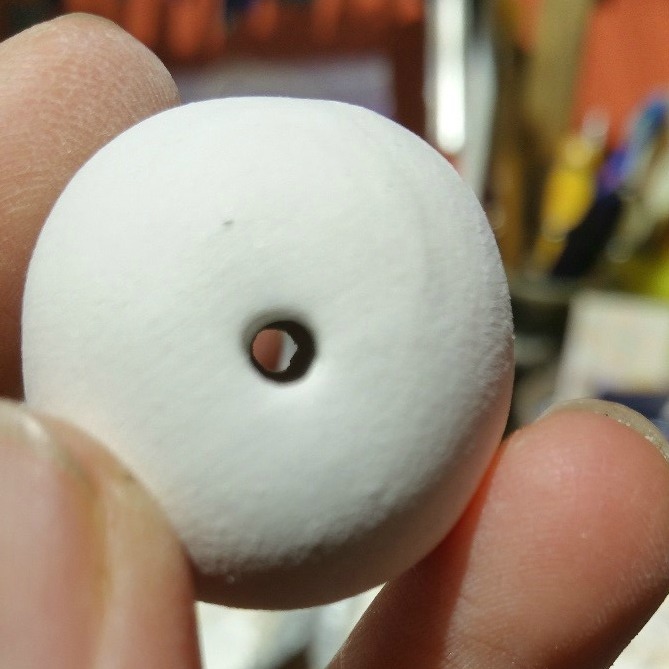
Important
to remember is that there needs to be a hole that reaches into the hollow part
of the clay for ceramic and metal clays (can’t say for sure about polymer but
my guess would be the same) – otherwise air can’t get out and that is when
things explode in the kiln.

You
will see with my elephant head- that my design idea did not allow for air to
escape, so I actually put a hole at the back.
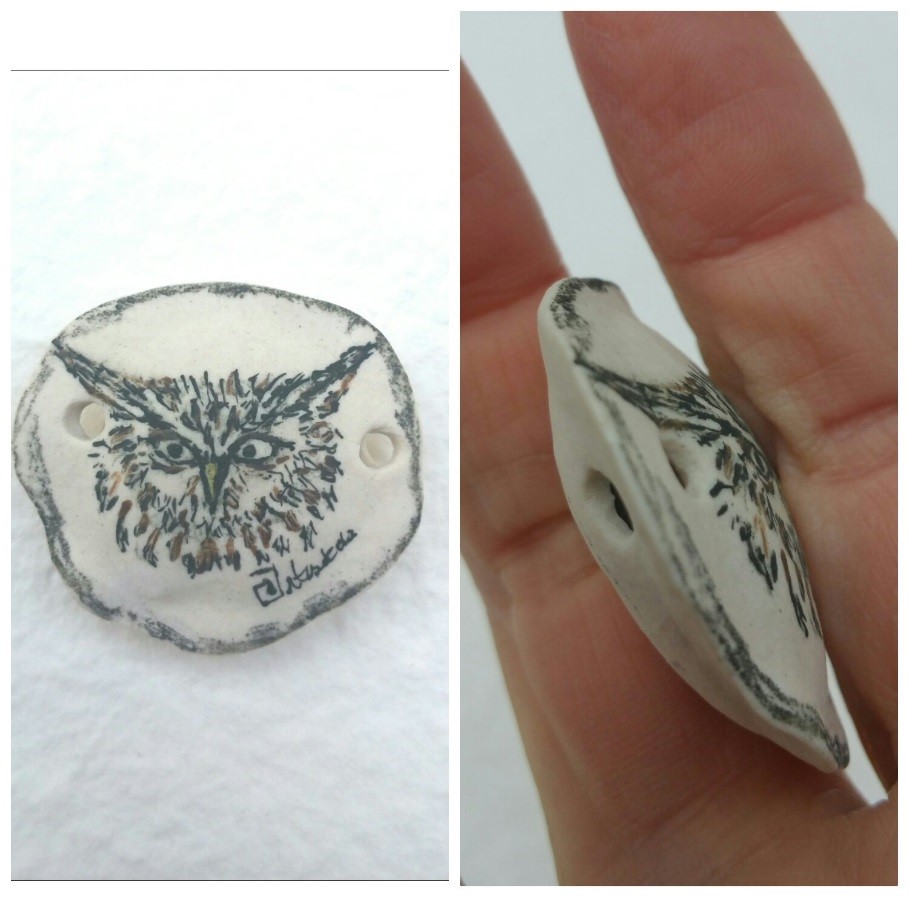
Here
is another hollow designs I made using this technique.

GIVEAWAY!!!! GIVEAWAY!!!!
And
this hollow hummingbird bead is for one you readers who are still reading, and
leave a comment. Winner will be chosen using random number generator. The winner will be picked next Thursday.
I look
forward to exploring with this technique much more and I hope you have enjoyed
this tutorial!
Terri
Del Signore – artisticaos.com
Saraccino
December 30, 2016 at 4:35 pmI have to try this idea! I am thinking of hollow beads with a lot of holes and an organic surface. Strangely enough, I used paper to create polymer clay beads, I use paper for ceramic clay sculptures as well as letter noodles for text in ceramic clay… but the link to create also ceramic beads this way didn't occur to me 😉 I would love to win your bead, the bird is lovely!
Terri Del Signore
January 3, 2017 at 5:54 amLetter noodles! Ha! Love it!!
Villa Türmchen
December 30, 2016 at 5:01 pmI like your hollow – beads verry much. This is a beautiful kind of making beads.
It woud be a big happines for me to win you nice bird – bead.
But I dont know, if you woud sent it to Germany?
Anyway, I wish you the best for the new year, Jana
Terri Del Signore
January 3, 2017 at 5:55 amThank you Jana! I will ship to Germany if your name gets chosen:)
Kathy
December 30, 2016 at 11:40 pmI always wondered about using paper pulp and I though I'd run into problems with the clay shrinking and breaking as it dried over the form, but it doesn't seem like this has been an issue at all for you. Any thoughts on this? Thanks for sharing your experiments with us. I really like your beads.
–Kathy of PajegoArtHouse
Terri Del Signore
January 3, 2017 at 5:58 amHi Kathy! I have done quote a few now and not had that happen once! I have even used porcelain – and for me that has the most shrinkage of all the clays I work with!! So far so good!
Bijoux Gems Joy
December 31, 2016 at 1:43 amVery interesting technique. I like the way your beads came out. I do remember seeing a post about using the paper beads to make hollow polymer clay beads. I am a novice at polymer clay and had forgotten all about it. Now I may have to try it on a play day.
Mona
Terri Del Signore
January 3, 2017 at 6:09 amThat will be a fun play day!
Kristen
December 31, 2016 at 11:15 amI think this would be a great technique for metal clay beads. You wouldn't need as much clay making the beads lighter and much less expensive! Thanks for the tut and the give away. Happy New Year!
Terri Del Signore
January 3, 2017 at 5:59 amI think so too! I look forward to trying it with metal clay!!
Kathy Lindemer
December 31, 2016 at 2:38 pmGreat tutorial! Thank you for sharing!
Terri Del Signore
January 3, 2017 at 5:01 pmThank you!
Barbara Hanselman - BHClaysmith
December 31, 2016 at 6:22 pmWhat a neat technique! One question though, can these paper shapes simply air dry or perhaps be dried in a very low temperature oven? I'm assuming that the cotton/paper burns away when finally kiln fired leaving a nice light weight bead to work with. Thanks for sharing your ingenuity!
Terri Del Signore
January 3, 2017 at 6:02 amHi Barbar! They could for sure air dry!! But you would need extreme patience as it would take a very long time. I would try the lowest oven setting and leave it cracked open a bit:)
Terri Del Signore
January 3, 2017 at 6:03 amOh and yes – all the paper burns away leaving a nice light bead!
Barbara Hanselman - BHClaysmith
December 31, 2016 at 6:29 pmGreat way to form light weight hollow beads and pendants; thanks for sharing!
Terri Del Signore
January 3, 2017 at 6:05 amThank you!
thecolorofdreams
December 31, 2016 at 6:33 pmGreat tutorial. Such interesting beads. Love the hummingbird!
Terri Del Signore
January 3, 2017 at 6:05 amThank you!
Pat Denning
December 31, 2016 at 6:53 pmTerri,
That is fascinating! The beads are wonderful. Now I have something else to try. God help my poor house! Happy New Year!
Terri Del Signore
January 3, 2017 at 6:06 amHaha! I hear you Pat! And thank you!
Lynn
December 31, 2016 at 11:43 pmSuch a clever idea! And, I just love that little hummingbird! Looking forward to seeing more of your wonderful creations. Lynn Carling
Terri Del Signore
January 3, 2017 at 6:07 amThank you Lynn!!:)
Shaiha
January 1, 2017 at 12:36 amThanks for the tutorial! And I love that hummingbird.
Terri Del Signore
January 3, 2017 at 6:08 amThank you!
KimG
January 1, 2017 at 3:11 amThank you for sharing your creative process with us! It's amazing seeing all the steps to make each beautiful piece. I would love to use the hummingbird in one of my pieces!
Terri Del Signore
January 3, 2017 at 6:08 amThank you Kim!
Mokki
January 1, 2017 at 12:57 pmCool technique. Thanks for the nifty tutorial. I love your elephant, it would look great in a necklace.
Terri Del Signore
January 3, 2017 at 6:10 amWhy thank you Mokki!!:)
Kristina
January 2, 2017 at 3:19 amI would love to try this technique with polymer clay. I have a concern though. Would the oven temp for polymer clay be enough to burn the paper?
Terri Del Signore
January 3, 2017 at 6:16 amI have very little experience with polymer clay but I am pretty certain the paper would not burn at the Temp used to bake polymer. I am under the impression that when paper is used inside polymer beads – it is removed after baking. One way would be to soak the bead in water (to turn the paper back to pulp) then use fine tweezers to pull it out of the bead hole.
Jo
January 2, 2017 at 4:54 pmI love artisans that keep finding ways to push limits and are successful.
Great job Terri!
Jo
Terri Del Signore
January 3, 2017 at 6:18 amThanks so much Jo! Your comment makes me smile!!